How to Choose Your First Home Espresso Machine
The right first setup pulls a sweet, balanced shot within your first few weeks. The wrong one hands you months of sour, thin, channelling shots and a shiny machine you slowly start to resent. And the difference between the two is almost never the machine on its own. It comes down to two decisions most people get backwards before they ever press the button: split the budget with the grinder, and let your boiler type follow how many milk drinks you actually pull. Get those two right and the rest of the spec sheet stops mattering nearly as much as the marketing wants you to think it does.
A quick note on how I write here. I'm Elliot, the founder of Shot & Steam, and I've spent 8-plus years pulling shots at my own counter in Portland, Oregon, on a single-boiler PID machine with an E61-style group and a single-dose espresso grinder. Leaving the pods behind, I blew almost my whole budget on a shiny dual-boiler and bought a cheap grinder with the leftovers — then chased sour shots for months before I worked out the grinder was the problem. That mistake is exactly why this site exists. The opinions here come from real time at the machine; the product numbers come from manufacturer specs and physics, not from any lab test I'm pretending to have run. If you read nothing else, read the next two sections — they are the whole game.
The machine-vs-grinder budget split
If you remember one thing from this guide, make it this: the grinder matters as much as the machine. Espresso lives or dies on a fine, consistent, adjustable grind, and a cheap grinder simply cannot deliver it. The reason is mechanical, not snobbery. Espresso forces water through a tightly packed bed of coffee at around nine bar of pressure in roughly 25 to 30 seconds. For that to extract evenly, every particle of coffee needs to be close to the same size, and that size needs to be very fine and finely adjustable. A grinder built for drip or a cheap blade gadget produces a wide spread of particle sizes — some dust, some boulders — and water does what water always does: it races through the gaps around the big bits (that's channelling) and over-extracts the dust, so the cup comes out sour and harsh at the same time.
So split your budget so the grinder is a real purchase, not an afterthought. A reasonable rule of thumb for a first setup is to spend at least as much on the grinder as you do on the machine, and to be honest, plenty of experienced home baristas would tell you to spend more on the grinder. A capable machine paired with a great grinder will out-pour an expensive machine paired with a poor one every single time. When you're ready to look at specifics, the grinders silo walks through burr type, stepless adjustment and single-dosing, and the best espresso grinders guide is where most readers start the grinder half of the buy.
Boiler architecture decoded
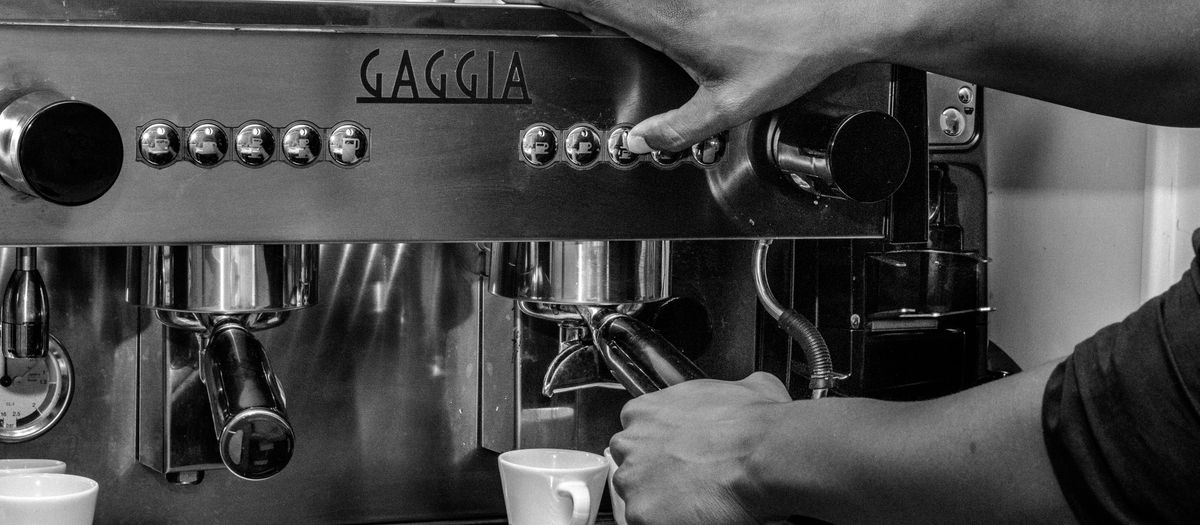
Boiler type is the spec people overthink most, and the language around it is needlessly intimidating. Strip away the jargon and there are really three families to understand, separated by one simple question: can the machine brew espresso and steam milk at the same time?
A single boiler heats one thing at a time. It holds water at brew temperature for pulling a shot, then has to switch and climb to a much hotter steam temperature before it can froth milk — so you brew first, wait while it heats up, then steam. For straight espresso or one or two milk drinks, that short wait is a non-issue. A single boiler with a good PID is, genuinely, a fantastic first machine, and it is exactly what I pull on every day.
A heat-exchanger (often shortened to HX) is a clever middle ground. It runs one boiler hot enough to make steam, and passes your brew water through a pipe — the heat exchanger — running through that hot boiler, so the brew water arrives at roughly the right temperature on demand. The practical payoff is that you can brew and steam near-simultaneously without waiting for the machine to switch modes. The trade-off is that HX brew temperature is a little less precise than a PID-controlled boiler and usually needs a "cooling flush" routine to tame it.
A dual boiler has two separate boilers — one held at brew temperature, one at steam temperature — so you genuinely brew and steam at once, with rock-solid temperature on the brew side. It is the most capable architecture and the most expensive, and it is where a lot of first-time money disappears unnecessarily. The full type-by-type breakdown, including the machine class question (manual/lever vs semi-auto vs auto), the E61 group, vibration vs rotary pumps and what nine bar really means, lives in the machines hub.
Why boiler type should follow your milk-drink count
Here's the buying logic that ties the boiler section to your wallet: choose the boiler architecture by how many milk drinks you actually pull, not by which machine looks the most impressive. The only thing a dual boiler truly buys you over a single boiler is the ability to brew and steam without waiting. That convenience is real and lovely — but it is only worth paying for if you are routinely making several milk drinks back-to-back.
Be honest with yourself about your real morning, not your fantasy café. If you mostly drink straight espresso, or you make one or two flat whites and that's it, a single boiler with a PID is plenty and the few seconds of switch time will never bother you. If two people in the house each want a latte every morning, a heat-exchanger or dual boiler starts earning its keep by saving you the back-and-forth. If you're regularly steaming for four or five drinks — guests, a busy household, the family that texts their order ahead — that's genuinely dual-boiler territory.
Count your milk drinks first, then choose the boiler; the money you save by right-sizing the boiler is exactly the money that should go into the grinder. The Machine Matcher does this calculation for you: enter your drinks per day, your split of milk drinks versus straight espresso, your budget and your counter space, and it points you at a boiler architecture and machine class — plus a heat-up and steam-recovery wait-time estimate so you know what daily life with that machine actually feels like.
PID, E61, pump and pressure — in plain terms
Four more specs come up constantly, and all four are simpler than they sound. A PID is just a smart thermostat. Instead of letting the boiler swing above and below your target like a basic thermostat does, it holds brew temperature steady shot to shot. That stability is the single feature that makes dialing in sane, because it removes one of the biggest hidden variables — if your temperature wanders, you can never tell whether a bad shot was the grind or the heat. On a first machine, prioritise temperature stability above almost everything else.
An E61 group is a particular, decades-old group-head design (the part the portafilter locks into) that's prized for being thermally stable and easy to service, and it provides a gentle pre-infusion — a few seconds of low-pressure wetting before full pressure hits, which helps the puck settle evenly and reduces channelling. It's a lovely design that many enthusiasts (me included) love, but it is a preference, not a requirement; plenty of excellent machines don't use it.
Vibration vs rotary pump is mostly about noise and plumbing. A vibration pump is the norm on home machines — perfectly capable, just buzzier for the few seconds it runs. A rotary pump is quieter and smoother and can be plumbed straight to a water line, but it's a prosumer feature you pay extra for and rarely need at home. And nine bar is simply the brewing pressure espresso is traditionally pulled at; almost every machine in this class is built around it, so it's a box that's nearly always already ticked rather than a number to chase.
The full beginner cart, in buying order
Espresso is a system, not a single appliance, and the order you buy in matters. Here's the cart in the sequence that keeps your money where it counts — the machine and grinder are the foundation, and the workflow tools are the cheap upgrades that punch far above their price.
- The machine — chosen on boiler type and PID, right-sized to your milk drinks. Start here, but don't overspend; see the best home espresso machines.
- The grinder — an espresso-capable burr grinder; it matters as much as the machine, so fund it properly.
- A tamper — matched to your portafilter basket diameter (usually 58mm), for an even, level puck.
- A distributor and WDT tool — for even puck prep and far less channelling; the cheapest big upgrade there is.
- A scale — for repeatable dose in and yield out, so every shot is a measurement, not a guess.
- A bottomless portafilter — so you can see channelling happen and dial it out.
- A knock box and descaler — for fast cleanup and the upkeep that keeps the machine healthy.
The whole back half of that list — tamper, distributor, WDT, scale, bottomless portafilter, knock box — lives in the accessories and workflow silo, where I sort out what's genuinely worth buying first versus what can wait. None of it is expensive; all of it makes your shots more repeatable.
Counter space and steam recovery, day to day
Two practical realities decide whether you'll actually enjoy a machine, and neither shows up in the headline specs. The first is counter space. Measure the spot the machine will live — width, depth and the height to the underside of any cabinet, because you need clearance to get the hopper filled and the portafilter swung out. The best machine on paper is the wrong one if it doesn't fit where you'll use it, and a cramped setup is a setup you quietly stop using. If your kitchen is tight, that constraint should shape the shortlist from the start.
The second is steam recovery — how long the machine needs between pulling a shot and being ready to steam milk (and, on a single boiler, back again). It's the difference between a relaxed morning and a frustrating one when you're making drinks for more than just you. This is exactly why the boiler-follows-your-milk-drinks logic matters in daily life, and it's the figure the Machine Matcher estimates for you from boiler architecture and published specs, so you can picture the real rhythm of using the machine before you buy.
Espresso is one half of home coffee
One honest framing before you spend: espresso is a wonderful rabbit hole, but it isn't the only way to make great coffee at home, and it isn't always the right tool for every cup. If you mostly drink black coffee and the milk drinks are occasional, a manual method can be a gentler, cheaper and lower-maintenance path to a genuinely excellent cup — and the two happily coexist on the same counter. For that side of home coffee, our sibling site Pour & Grind covers pour-over and manual brewing in the same plain-English, spec-led way. Everything on Shot & Steam stays squarely about espresso hardware; if your heart's set on the shot and the steam, you're in the right place.
The debates worth having an opinion on
A few questions come up over and over when people are choosing a first machine, and you'll get contradictory answers everywhere. Here's where I land after years at my own counter, offered as strong opinions rather than rules — your mileage may vary, but these are the defaults I'd give a friend.
Do you really need a dual boiler? For most home setups, no. The dual boiler's one real superpower is brewing and steaming at once, which only pays off when you're making several milk drinks back-to-back. If that's not your morning, the money is better spent elsewhere — and "elsewhere" almost always means the grinder.
Do you need a PID? This one I'd actually push on: yes, prioritise it. Stable brew temperature is what makes dialing in possible, and it removes a hidden variable that otherwise drives beginners up the wall. Of all the specs, temperature stability is the one I'd protect first.
Do you need an E61 group? No — but it's lovely if it fits the budget. The E61 is a proven, serviceable design with gentle passive pre-infusion, and plenty of enthusiasts swear by it. It's a preference, not a requirement, and there are excellent machines without one.
Single-dose or hopper grinder? If you switch beans often or want the freshest possible grind, single-dosing is the nicer daily ritual and keeps retention low. A hopper grinder is more convenient if you plough through one bag of the same coffee. Either can make great espresso; pick the workflow you'll actually enjoy. The grinders silo digs into this in full.
Your first dial-in, in plain terms
Once the gear lands, dialing in is simpler than the internet makes it sound. Start from a common reference point: weigh a dose into the basket (an 18g dose into an 18g basket is a fine starting place on most machines), aim for a yield of roughly twice the dose — that's a 1:2 ratio, so about 36g out from 18g in — and time the shot at around 25 to 30 seconds. Then taste and adjust one thing at a time.
The two flavours to listen for are sour and bitter, and they tell you which way to move. Sour, sharp, thin usually means under-extracted: the shot ran too fast, so grind finer to slow it down and pull more from the coffee. Bitter, harsh, dry usually means over-extracted: the shot ran too slow, so grind coarser. Change grind in small steps, keep your dose and ratio steady while you do, and you'll converge on a sweet, balanced shot within a handful of attempts. This is exactly the logic the dial-in calculator walks you through — enter your dose and target ratio and it gives you a target yield and a starting direction to adjust. Don't expect café shots on day one; sour and bitter aren't failures, they're the signposts that get you there.
The rookie mistakes to skip
- Skimping on the grinder. A cheap grinder ruins more first setups than a cheap machine ever will.
- Over-buying boiler. The shiny dual-boiler + cheap grinder trap is the classic budget mistake.
- Ignoring counter space. The best machine is the one that fits where you'll actually use it.
- Expecting café shots on day one. Dialing in takes practice — sour and bitter are signals, not failures.
Frequently asked questions
What is the best home espresso machine for a beginner?
For most beginners, a single-boiler machine with a PID, paired with a proper single-dose espresso grinder, is the best-value first setup. It puts your money into accurate brew temperature and a good grind rather than a second boiler you may not need. Step up to a heat-exchanger or dual-boiler only when you pull enough milk drinks to want to brew and steam at once.
Does the grinder really matter as much as the machine?
Yes — this is the single biggest first-buy lesson. Espresso needs a fine, consistent, adjustable grind, and a cheap grinder cannot deliver that. A great machine fed by a poor grinder still pulls sour, channelling shots. Split the budget so the grinder is not an afterthought.
Single boiler, heat exchanger or dual boiler?
A single boiler heats one thing at a time, so you brew then steam with a short wait — fine for one or two milk drinks. A heat-exchanger lets you brew and steam near-simultaneously from one boiler. A dual boiler has separate brew and steam boilers for true back-to-back milk drinks. Match the architecture to how many milk drinks you actually pull.
How much should I spend on a first espresso machine?
A genuinely capable home machine generally starts in the few-hundred-dollars range, but remember to split the budget with the grinder. Overspending on a shiny dual-boiler and pairing it with a cheap grinder is the classic first-buy mistake — and the reason this site exists.
Do I need a PID and an E61 group?
A PID keeps brew temperature stable shot to shot, which makes dialing in far easier — well worth it. An E61 group is a proven, serviceable design with passive pre-infusion that many enthusiasts love, but it is not mandatory for a good shot. Buy the temperature stability first; the group design is a preference.
What does pre-infusion do?
Pre-infusion gently wets the coffee puck at low pressure before full pressure hits, which helps the puck settle evenly and reduces channelling. It can come from the machine's design (like an E61 group) or be programmable. It is a nice-to-have that makes consistent extraction easier, not a make-or-break feature.
Where to go next
The four silos, each starting from a beginner-first hub.